The Biggest Problems of DIY Desalination
There is very little doubt that DIY desalination can be effective. However, there are some potential issues that you should be aware of:
A big draw back is the amount of time it takes.
This issue is even more annoying when you consider that DIY methods only produce a small amount of clean drinking water each time.
It also takes a lot of time and energy to set everything up.This is why it’s often recommended to actually have an emergency desalination kit in cases when you don’t have time to spare.
Another issue is what are the chances of having all of the necessary materials to hand when you actually need it during an emergency? For instance, where do you get a steady supply of aluminum foil when you’re stranded on a desert island?
Once you create a DIY desalinator, how easy is it to store and keep clean? The chambers, rubber tubing and glass jar will not stay clean forever. This means you’ll probably also need to have soap and clean water to hand.
Finally, this is intended to be a portable desalination unit but in reality how portable is it? The answer is that it isn’t. At best it needs to be taken apart and then put together each time you need to use it. It’s a good skill to have and even better to know how it works but not very practical.
Solution:
If you really want to have full portable desalination then your best bet is to have a commercially available kit to hand.
| Product | |
| Katadyn Survivor 35 Desalinator | |
| Katadyn Survivor 06 Desalinator |
|
Solar-Powered Non-Electric Emergency Water Distiller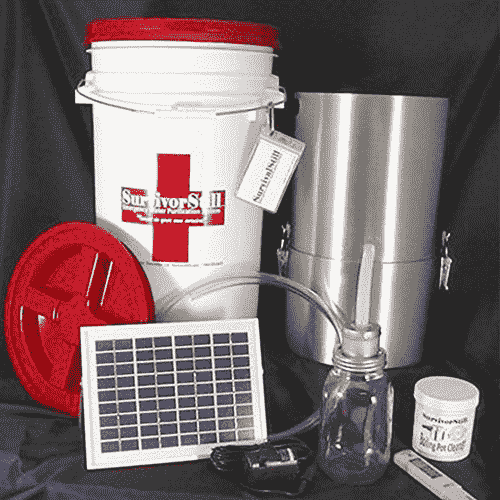 |
What is Water Distillation?
This is a method of water purification that involves using heat to separate water from any contaminants it may contain.
The clean evaporated water generated by the heat is stored in a separate container.
Unlike the other methods like solar energy, boiling water and capturing the clean condensed water is a lot more controlled. It is also a lot more effective as it can produce far more water at a much quicker pace.
For instance, instead of waiting for the sun to appear, you can simply get the water to boil at your desired temperature. It is not unheard of to purify a gallon of salt water into drinking water after a few hours.
Although this method sounds very easy, remember that you also need fuel and a way to cool it down (e.g. with ice). This is in order to contain the water that evaporates from the distillation process.
What is Water Desalination?
Water desalination is the process by which you separate the salty minerals from water so that fresh drinking water is left behind.
Desalination By Boiling and Distilling Water
The portable desalination process can be as simple as getting a dish pan, boiling the salt water and taking out the steam water.
This works because the salt will be left behind in the pan after you leave it alone for a few hours. This is why the most basic kind of portable desalination you can do to filter salt water is the one you can do at home.
Desalination By Solar Power
Another way to filter salt water is to use a solar pan. This is one of the most common forms of DIY portable desalination. Partly because we are used to seeing this in “desert island stranded movies”.
The protagonist in these movies usually puts the salt water in a large pot while placing a cup in the center. They then put a plastic sheet over the entire contraption with a small hole in the middle.
This solar method works when the vapor arises from the salty sea water and condenses at the top of the plastic. There should be a glass waiting to catch the salt free drinking water that condenses.
This is by far one of the most effective salt water filtration systems, especially if you don’t have a budget. However, it heavily relies on your access to the sun.
How To Build A Desalination Unit
How this works in detail:
This is a quick and easy portable desalination guide. It’s ideal for people that live near the sea and maybe have a short supply of clean drinking water.
This is also a useful resource for those who would like to have this basic DIY survival skill.
Perhaps you travel a lot or love spending time in the wilderness, outdoors and hiking. Being able to filter salt water might just be a life saver.
Fortunately, it is possible to perform personal desalination by using every day items that are not difficult to find. It’s not a difficult process and can be done by almost anyone in almost any situation.
Here is a list of what you will need to perform your very own personal water desalination:
- Glass Jar
- Stove
- Cloth
- 2 Pots
- Rubber Tubing
- Aluminum Foil
4 Simple Steps To Build A Desalination Unit
i. Set up the desalination container by covering one pot with the aluminum foil. While covering this, be sure to also create a small opening for the rubber tubing.
ii. Tie the rubber tubing to the small opening you have just made and ensure it’s airtight. This connection will be the evaporation case for your salt water filter.
iii. Now, run a small section of the rubber tubing through the inside of the other pot. This second pot is going to be your condensation chamber.
You will later need to surround this pot with ice water. And the point of this is to create the condensation container that will filter out your fresh drinking water.
iv. The final step is to take the glass jar and use it as a collection container for the filtered water. For this to work you need to point the free end of the rubber tube and place it into the glass jar.
How to Use Your DIY Portable Desalination Unit
- Put the salt water into the pot (the one with the aluminum foil). Then put this pot (with the salt water) on a gas burner / stove / fire – any way to get the water to boil.
- You need to make sure this pot with the salt water and the other one are on the same level.
- Finally, make sure the glass jar is on a lower level then the other 2 containers. This will allow the filtered fresh drinking water to flow into the jar with a little help from gravity.
How Does Your DIY Portable Desalination Work?
The portable DIY desalination set up you have just put together works because the heat separates the water from its salt minerals.
The heat creates water vapor, which rises thereby leaving the salt at the bottom of the desalination container.
The best part of this is that the DIY portable desalination unit you have just put together doesn’t just remove salt it also removes other solids. This includes things like dirt, metals, bacteria and parasites.
This means that you are not just getting out the salt but also other solids. Or to be more precise, it leaves all the harmful solids behind. So you should always wash out the pot and containers each time you use them.
Once the salt water is heated it releases water vapor and this vapor has to go somewhere. This is why you have rubber tubing, it transports the vapor from the first container to the second one.
The purpose of the ice is to cool the air vapor when it goes through and it condenses the pure air vapor.
Once the vapor returns to a fully liquid state (and it starts to look like drinking water), the salt is left behind.
Ultimately, once the heat separates the salt from the water, the rest is down to gravity. This is what makes the clean water flow into the glass jar, hence why the jar needs to be lower than the condensation chamber.
Why is the Sea Salty?
In simple terms, the sea is salty because it is full of a vast multitude of different minerals.
These minerals have been present in the sea since the very beginning. So in some ways all that saltiness is essentially a taste of history.
Sadly all that salty “history” in the water is not good for you. And you must always remove salt from sea water before drinking in order to make it healthy. The process of doing this is called desalination, and it is surprisingly much easier than you might expect.
How To Fix Desalination DIY FLAWS? Buy One.
If you want to avoid all the problems linked to creating your very own DIY portable desalination unit then get a reliable easy to use kit.
 When you buy one, make sure you try it straight away.
![]()
The worst thing is to get a portable desalination kit, store it and only use it in the case of an emergency only to find it doesn’t work.
It’s also a good idea to not buy a portable desalination kit that needs solar power just because the sun is not always reliable.
Your best bet is to get a desalination kit that doesn’t need charging, batteries and can work independently.
Fortunately, the market is full of amazing desalination devices that work very in pretty much every situation you can imagine.
My top water portable desalinator recommendations:
| Product | |
| Katadyn Survivor 35 Desalinator | |
| Katadyn Survivor 06 Desalinator |
|
| Solar-Powered Non-Electric Emergency Water Distiller |
Scientific References
Fischetti, Mark (September 2007). “Fresh from the Sea”. Scientific American. 297 (3): 118–119. Bibcode:2007SciAm.297c.118F. doi:10.1038/scientificamerican0907-118. PMID 17784633.
Al-Shammiri, M.; Safar, M. (November 1999). “Multi-effect distillation plants: state of the art”. Desalination. pp. 45–59. doi:10.1016/S0011-9164(99)00154-X
Fritzmann, C; Lowenberg, J; Wintgens, T; Melin, T (2007). “State-of-the-art of reverse osmosis desalination”. Desalination. 216: 1–76. doi:10.1016/j.desal.2006.12.009.
H.T. El-Dessouky, H.M. Ettouney, Fundamentals of Salt Water Desalination, Publisher Elsevier, 2002 ISBN 0080532128, 9780080532127
Desalination — A Critical Element of Water Solutions for the 21st Century. Chapter in “Drinking Water – Sources, Sanitation and Safeguarding by Lisa Henthorne, printed and distributed August 2009 by The Swedish Research Council Formas.
2 Comments
Comments are closed.

Would love to get me afew of your desalination systems
Hi Angela
Which one’s? Most of them are available through Amazon.
Stay hydrated,
Luke